

(C)GMO Internet, Inc. 再使用禁止
サーバーのWordPress環境が遅くなったため、今月からConoHaのVPSに移行しました。
通常ではkusanagiコマンドで取得できる「Let's Encrypt」のSSL証明書は一つのドメインだけですが、サブドメインを利用できるワイルドカードのSSL証明書を取得してHTTPSに設定したので、その方法を紹介します。
ワイルドカードSSL証明書を取得するための環境と下準備
- VPSのアプリは、「かんたんKUSANAGI」ではなく、「WordPress(KUSANAGI)」を選択
- 実行環境は「CentOS 7.6 + nginx」
- ドメインのDNS設定はConoHaコントロールパネルで設定済み
(サブドメインを含む) - Windows用SSHクライアント「Poderosa」を使用
CentOSのバージョン確認方法
cat /etc/redhat-releasekusanagiプロファイルの確認
vi /etc/kusanagi.d/profile.conf[ichitaso]
PROFILE="ichitaso"
KUSANAGI_TYPE="WordPress"
KUSANAGI_FQDN="ichitaso.com"
KUSANAGI_DIR="/home/kusanagi/ichitaso"おかしなところがあったら修正
「Let's Encrypt」のSSL証明書の発行
全てroot権限で実施します。
Let's Encrypt用のFQDNを設定する

Conoha DNS設定にて「_acme-challenge」をAレコードでIPアドレスに向ける。
(AレコードはサーバーのIPアドレス)
certbotのインストール
yum install certbot既存の証明書を消す
cd /etc/letsencrypt
rm -frv ./*
SSL証明書の発行
certbot certonly --manual \
    --preferred-challenges dns-01 \
    --server https://acme-v02.api.letsencrypt.org/directory \
    -m [あなたのEmailアドレス] \
    -d [あなたのドメイン名] \
    -d *.[あなたのドメイン名]
- - - - - - - - - - - - - - - - - - - - - - - - - - - - - - - - - - - - - - - -
NOTE: The IP of this machine will be publicly logged as having requested this
certificate. If you're running certbot in manual mode on a machine that is not
your server, please ensure you're okay with that.
Are you OK with your IP being logged?
- - - - - - - - - - - - - - - - - - - - - - - - - - - - - - - - - - - - - - - -
(Y)es/(N)o: YIPアドレスを公開されているログに記録されるよう聞かれるので「Y」を入力します。ここで「N」を選択すると先へ進まずに終了します。
- - - - - - - - - - - - - - - - - - - - - - - - - - - - - - - - - - - - - - - -
Please deploy a DNS TXT record under the name
_acme-challenge.example.com with the following value:

xxxxxxxxxxxxxxxxxxxxxxxxxxxxx-vV3iHQ

Before continuing, verify the record is deployed.
- - - - - - - - - - - - - - - - - - - - - - - - - - - - - - - - - - - - - - - -
Press Enter to Continue
ConoHaのDNSサーバーに、上記の内容の TXTレコードを追加する必要があります。ConoHaコントロールパネルのVPN欄で設定します。

タイプ:TXT
名称 :_acme-challenge
値 :xxxxxxxxxxxxxxxxxxxxxxxxxxxxx-vV3iHQ
反映されるまで15~20分は待ってから「Enter」を押してください。
まったりコーヒーでも飲んでくつろぎましょう。
失敗したらもう一度TXTを新しいものにして再チャレンジします。
(ここで結構ハマりました)
成功すれば以下のように出力されて完了です。
Waiting for verification...
Resetting dropped connection: acme-v02.api.letsencrypt.org
Resetting dropped connection: acme-v02.api.letsencrypt.org
Cleaning up challenges
Resetting dropped connection: acme-v02.api.letsencrypt.org

IMPORTANT NOTES:
 - Congratulations! Your certificate and chain have been saved at:
   /etc/letsencrypt/live/example.com/fullchain.pem
   Your key file has been saved at:
   /etc/letsencrypt/live/example.com/privkey.pem
   Your cert will expire on 2019-08-30. To obtain a new or tweaked
   version of this certificate in the future, simply run certbot
   again. To non-interactively renew *all* of your certificates, run
   "certbot renew"
 - If you like Certbot, please consider supporting our work by:

   Donating to ISRG / Let's Encrypt:   https://letsencrypt.org/donate
   Donating to EFF:                    https://eff.org/donate-le
nginxのSSL設定ファイルを変更する
オリジナルをバックアップ
cp /etc/nginx/conf.d/[プロファイル名]_ssl.conf /etc/nginx/conf.d/[プロファイル名]_ssl.conf.bakSSL部分を編集
vi /etc/nginx/conf.d/[プロファイル名]_ssl.confcert:
/etc/letsencrypt/live/example.com/privkey.pemkey:
/etc/letsencrypt/live/example.com/privkey.pem参考:
#=======================================
# ichitaso.com SSL
#---------------------------------------

server {
	listen       443 ssl http2;
	server_name  ichitaso.com;

	ssl_certificate      /etc/letsencrypt/live/ichitaso.com/fullchain.pem;
	ssl_certificate_key  /etc/letsencrypt/live/ichitaso.com/privkey.pem;
nginxを再起動して反映させる
nginx -t
nginx -s reload
kusanagi restart問題なければこれで「サブドメインを含むワイルドカードのSSL」を設定することができました。
SSL証明書の自動更新を設定する
このままでは「Let's Encrypt」の証明書は90日間で失効します。
そこで、更新を忘れないように自動更新を設定しておきます。
手動でのSSL証明書の更新
証明書の更新
certbot renewSaving debug log to /var/log/letsencrypt/letsencrypt.log
- - - - - - - - - - - - - - - - - - - - - - - - - - - - - - - - - - - - - - - -
Processing /etc/letsencrypt/renewal/example.com.conf
- - - - - - - - - - - - - - - - - - - - - - - - - - - - - - - - - - - - - - - -
Cert not yet due for renewal
- - - - - - - - - - - - - - - - - - - - - - - - - - - - - - - - - - - - - - - -
The following certs are not due for renewal yet:
/etc/letsencrypt/live/example.com/fullchain.pem expires on 2019-08-30 (skipped)
No renewals were attempted.
- - - - - - - - - - - - - - - - - - - - - - - - - - - - - - - - - - - - - - - -上記のように、更新するほど古くないのでスキップしたと表示されればOK。
自動更新を有効にする
証明書は3か月に一回更新が必要です。そのままだと有効期限が30日未満のときしか更新されないため自動更新を設定します。
はじめに「crond」が正常稼働していることを確認
service crond statusRedirecting to /bin/systemctl status crond.service
● crond.service - Command Scheduler
Loaded: loaded (/usr/lib/systemd/system/crond.service; enabled; vendor preset: enabled)
Active: active (running) since Sat 2019-06-01 05:39:22 JST; 4 days ago
Main PID: 3612 (crond)
CGroup: /system.slice/crond.service
└─3612 /usr/sbin/crond -n
Jun 01 05:39:22 kusanagi83 systemd[1]: Started Command Scheduler.
Jun 01 05:39:22 kusanagi83 crond[3612]: (CRON) INFO (RANDOM_DELAY will be scaled with factor 87% if used.)
Jun 01 05:39:22 kusanagi83 crond[3612]: (CRON) INFO (running with inotify support)Active: active (running)となっていれば動作しています。
参考:crondの起動
service crond start自動起動設定の確認
systemctl is-enabled crond自動起動設定がされている場合は「enabled」と表示されます。
設定がされていない場合は「disabled」と表示されます。
参考:自動起動の設定
systemctl enable crondデフォルトでは有効になっているので問題ないと思います。
cronへの設定方法
vi /etc/cron.d/letsencrypt15 * * * * /usr/bin/certbot renew && nginx -s reload上記を入力して保存します。(毎時15分になると実行する例)
実際に実行されるか最初に間隔を短くして確認するといいです。
crondの再起動
systemctl restart crond設定の確認
less /var/log/cron | grep letsencrypt指定した時間後に上記コマンドを入力して実行されたか確認
Jun 6 04:24:01 kusanagi83 crond[13990]: (*system*) RELOAD (/etc/cron.d/letsencrypt)自動実行の確認ができました!(実行されるまでは何も出力されません)
そのままだと短すぎるので設定間隔を長くします。
「/etc/cron.d/letsencrypt」を以下へ上書き保存します。
vi /etc/cron.d/letsencrypt0 4 1 * * /usr/bin/certbot renew && nginx -s reload最初に入力した部分を消して、上記を入力し保存します。
毎月1日の4:00に更新する設定になります。
crondの再起動
systemctl restart crond以上で自動更新の設定が完了しました!
HSTSを設定する方法
※よくわからない方は絶対に実行しないでください
設定場所
kusanagi --hsts onこのコマンドで自動的に「/etc/nginx/conf.d/プロファイル名_ssl.conf」にHSTSの設定が追加されますが、ワイルドカードで証明書を作成しているためか以下のエラーが出ます。
Warning: Empty directive or extra semicolon hsts nginx
修正方法
add_header Strict-Transport-Security ~ を以下へ追記及び書き換える
vi /etc/nginx/conf.d/example_ssl.conf/etc/nginx/conf.d/プロファイル名_ssl.conf
server {
	listen       443 ssl http2;
	server_name  example.com;

~ 略 ~

	# HSTS
	add_header Strict-Transport-Security 'max-age=31536000; includeSubDomains; preload';

~ 略 ~

	location ~* /wp-login\.php|/wp-admin/((?!(admin-ajax\.php|images/)).)*$ {
		# HSTS
		add_header Strict-Transport-Security 'max-age=31536000; includeSubDomains; preload';

~ 略 ~

	location ~ [^/]\.php(/|$) {

		# HSTS
		add_header Strict-Transport-Security 'max-age=31536000; includeSubDomains; preload';
書き換え後にngixとkusanagiを確認・再起動
サブドメインを設定している場合、同様に「server」内にHSTSの記述をする必要があります。
add_header Strict-Transport-Security 'max-age=31536000; includeSubDomains; preload';参考:サブドメイン用のconf
server {
	listen       443 ssl http2;

	server_name cydia.ichitaso.com;
	root /home/kusanagi/ichitaso/DocumentRoot/apt;

	charset UTF-8;
	client_max_body_size 16M;

	ssl_certificate      /etc/letsencrypt/live/ichitaso.com/fullchain.pem;
	ssl_certificate_key  /etc/letsencrypt/live/ichitaso.com/privkey.pem;

	# HSTS
	add_header Strict-Transport-Security 'max-age=31536000; includeSubDomains; preload';

	#ADD END
	ssl_dhparam /etc/kusanagi.d/ssl/dhparam.key;

	ssl_session_tickets     on;
	ssl_session_ticket_key     /etc/kusanagi.d/ssl_sess_ticket.key;

	ssl_session_cache shared:SSL:1m;
	ssl_session_timeout  5m;

	ssl_protocols TLSv1.2 TLSv1.3;

	ssl_ciphers "AES128+ECDHE:AES256+ECDHE:AES128+EDH:AES256+EDH:HIGH:!aNULL:!eNULL:!EXPORT:!DES:!MD5:!PSK:!RC4!CAMELLIA!AES128-SHA!AES128-SHA256!AES128-GCM-SHA256:!AES256-GCM-SHA384:!AES256-SHA256:!AES256-SHA!AES256-CCM8!AES256-CCM!AES128-CCM!ARIA128-GCM-SHA256!AES128-CCM8!ARIA256-GCM-SHA384";

	ssl_prefer_server_ciphers   on;


	# index.phpをリダイレクト
	if ($request_uri ~* "^(.*/)index\.php$") {
		return 301 $1;
	}
	# index.htmlをリダイレクト
	if ($request_uri ~* "^(.*/)index\.html$") {
		return 301 $1;
	}
}
これを記述していなかったため、Cydiaのdepictionを設定していても表示されませんでした。(一週間以上ハマりました…)
あとはnginxを再起動して反映させてください。
nginx -t
nginx -s reload
kusanagi restart
再度登録することで、HSTSが有効になりました。
SSLグレードを確認する
こちらの評価サイトで確認します。
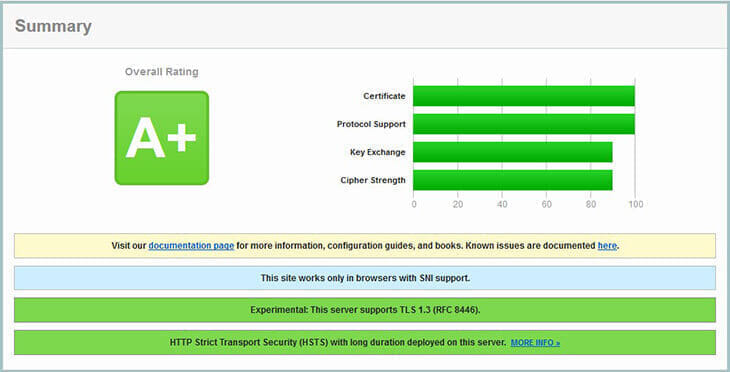
HSTSを設定したことにより、「A+」の評価となりました。
まとめ
現在は、Cloudflareで設定していますが、ConoHaのkusanagiにWordPressを移したことによって、劇的に速度が改善されました。
「WordPress Popular Posts」インストール前とキャッシュを削除しまくる前の「PageSpeed Insights」と「GTmetrix」でのスコア

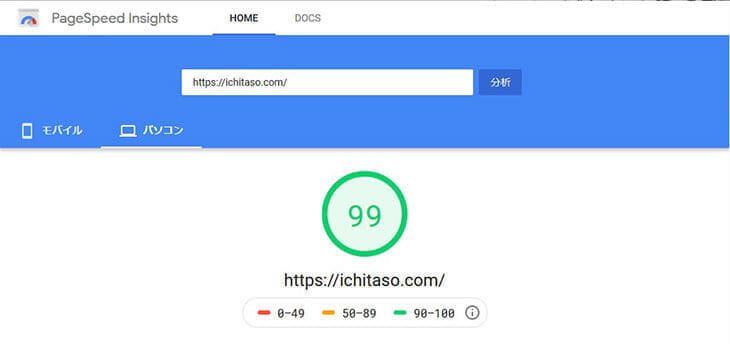

だいぶサイト応答速度が軽くなり、管理画面での操作もサクサクになりストレスが無くなりました。
なんと!下の画像からConoHaを使い始めると「1,000円分のクーポン」がもらえます!

(C)GMO Internet, Inc. 再使用禁止
VPSは最低でも「1GBプラン」を選んでください。後々グレードアップができます。「512MB」を選んでしまうと変更することができないので注意してください。
時間制なので、途中でやめても使用料金は発生しませんのでご安心ください。
あとは「かんたんKUSANAGI」ではなく、「WordPress(KUSANAGI)」を選択することを忘れないようにしてください。
以上、備忘録件ご参考になれば幸いです。